As you've read in my last post, I've moved to The Wise Alternative and am now blogging there.
After receiving a LOT of help from a fellow blogger...ahem Adrienne of Whole New Mom...(THANK YOU!!)....the RSS Feed is working and I managed to install the Google Follower widget all by myself.
I expect Microsoft's call any second with a big $$$$ job offer......
With those two crucial steps done....I invite you to sign up at my new blog at The Wise Alternative as we continue this adventure.
Thanks and we'll see you soon!! If you have any questions don't hesitate to ask.

Showing posts with label 5 Star Recipes. Show all posts
Showing posts with label 5 Star Recipes. Show all posts
Monday, September 26, 2011


Tuesday, November 9, 2010
Tasty Tuesdays! Eggplant & Cheese Lasagna
How is everyone liking the time change so far?? I was grateful for the extra hour of sleep when it happened but I'm verrrry tired and my get up and go took off somewhere without me.... Of course that could have something to do with the fact that we worked cows for the entire weekend!! :-) It's times like these that I realize I'm not 25 anymore....I creak and pop and snap more than I used to while I'm engaged in all of these day to day activites and it takes a lot longer to recover. My dad just laughes at me and says....."Wait until you're in your 60's and then tell me how you feel!!"
We got all of the cattle worked, nobody got hurt, and there was a lot of good food and good times had by all. What more could you ask for??

This week's post is a tasty creation cooked by my friend Michael Fusco of Michael Fusco's Riverside Grill in Tulsa, OK. For those of you that may not know, Michael is a 5 star chef and good guy that has allowed me to share some of his awesome recipes on the blog for all to see. Let's get to it....
Ingredients:
Preparation:

Dredge the eggplant in flour and shake off the excess. Saute the eggplant until golden. The flour protects the eggplant as you sautee with a small amount of oil, high heat (400 deg to sear, seals outside, holds flavor)
Combine the milk with the roux and nutmeg. Bring to a boil while stirring, and then reduce and keep on low heat until it becomes thick.
Cover the bottom of a Pyrex with some of the bechamel sauce, (Italian white sauce) and then put one layer of noodles, then white sauce, then cheese, then eggplants, then white sauce again, etc. Continue with the same process: spread the remaining cheese on top and bake in the oven for about 1 hour at 375 degrees F.

We got all of the cattle worked, nobody got hurt, and there was a lot of good food and good times had by all. What more could you ask for??

This week's post is a tasty creation cooked by my friend Michael Fusco of Michael Fusco's Riverside Grill in Tulsa, OK. For those of you that may not know, Michael is a 5 star chef and good guy that has allowed me to share some of his awesome recipes on the blog for all to see. Let's get to it....
Ingredients:
- 2 eggplant, peeled and sliced lengthwise, very thin, salted (salt acts as a draw for the bitterness)
- 4 lasagna sheets or 1 box lasagna blanched (cook pasta "al dente")
- 1 cup rice flour
- 1 quart milk
- 2 oz butter - 2 oz rice flour
- 3 cups or more shredded mozzarella
- 24 oz. whole milk ricotta or more
- 2 cups pecorino feather shredded
- Salt & pepper to taste
Preparation:

Dredge the eggplant in flour and shake off the excess. Saute the eggplant until golden. The flour protects the eggplant as you sautee with a small amount of oil, high heat (400 deg to sear, seals outside, holds flavor)
Combine the milk with the roux and nutmeg. Bring to a boil while stirring, and then reduce and keep on low heat until it becomes thick.
Cover the bottom of a Pyrex with some of the bechamel sauce, (Italian white sauce) and then put one layer of noodles, then white sauce, then cheese, then eggplants, then white sauce again, etc. Continue with the same process: spread the remaining cheese on top and bake in the oven for about 1 hour at 375 degrees F.
Cooking tips: You can add sauteed minced meat in between the layers.
Preparation time: 40 minutes
Cooking time: 60 minutes
Zucchini or summer squash can also be used if preferred.
Bechamel sauce - (Half butter and half flour) Melt butter and add rice flour slowly. Flour becomes encapsulated in the fat. Keep on high heat until the roux has a very light white color. When you combine milk, return to heat nad the flour will soak up moisture making a thick creamy sauce.

Eggplant is not my favorite food in the whole world...Alright I admit it, I never eat eggplant because I just plain don't like it!! However, I was always taught to try everything on my plate and eat a respectable portion so as not to insult the host. I did so and found that in this case, it was good!! Perhaps it's because I love pasta so much, maybe it was the bechamel sauce, I don't know, but I liked it and that is saying something! It's also Gluten Free!!
Enjoy!!
This post is part of the following blog carnivals.....Go check out these great sites!!
Hearth 'n Soul
Slightly Indulgent Tuesdays
Tuesday Twister
Real Food Wednesday
Gluten-Free Wednesdays
Pennywise Platter Thursday
Slightly Indulgent Tuesdays
Tuesday Twister
Real Food Wednesday
Gluten-Free Wednesdays
Pennywise Platter Thursday
Tuesday, November 2, 2010
Tasty Tuesdays! Coq au Vin
Things have been extremely busy in my neck of the woods lately. Adding new items to the shopping cart, adding our very own J & L Health private label to some of them and working on getting the double blind medical study results published for Intestinal Calm for Celiacs, along with the article in the medical journal has made for a busy Jason. Let's not forget trail riding because I've never forgotten how to play hard.....
I am working feverishly, not always to be confused with efficiently, on redesigning the theme of the blog. After a good conversation with a friend of mine a few weeks ago, I knew more than ever I wanted to make some changes and mix it up a little.
I love to do so many things in life that to me are second nature, but as she pointed out can be fascinating to so many others. As you all know, I LOVE to cook in my dutch ovens, and as many more don't know, ride horses, hunt, fish, have a garden, and countless other things. So in the coming days, the blog will take on a new look and feel. There will be always be a Tasty Tuesday and I think I will add a day for strictly Dutch Oven cooking as well. Another day, perhaps Wednesdays or Fridays will be a look back into many of the things that I did growing up that I hope you will enjoy and share with your friends and other bloggers.
This weeks post is one that left me scratching me head and I will be the first to admit, when I saw the recipe for Coq au Vin I thought..."What in the world is that?" It was first more of a fact finding journey than knowing what I was about to eat. When I found out it was braised chicken I knew I would love it! Michael Fusco makes this dish outstanding and I will be trying out my own version verrrry soon!!
The recipe is as follows:
Ingredients

Brown bacon on medium high heat in a dutch oven big enough to hold the chicken, about 10 minutes. Remove the cooked bacon, set aside keeping the bacon fat in the pan. Working in batches if necessary, add onions and chicken, skin side down. Brown the chicken well, on all sides, about 10 minutes. Halfway through the browning, add the garlic adn sprinkle the chicken with salt & pepper. Adding salt while cooking, instead of at the very end, will bring out the flavor of the chicken.
Spoon off any excess fat. Add the chicken stock, wine, and herbs. Add back the bacon. Lower heat to a simmer. Cover and cook for 20 minutes, or until chicken is tender and cooked through. Remove the chicken and onions to a separate platter. Remove the bay leaves, herb sprigs, garlic and discard.
Add mushrooms to the remaining liquid and turn the heat to high. Boil quickly and reduce the liquid by 3/4 until it becomes thick and saucy. Lower the heat, stir in the butter. Return the chicken and onions to the pan to reheat and coat with sauce. Adjust seasoning. Garnish with parsley and serve.

This dish is a bit of work but WELL worth the effort! Excellent flavor, a great winter time meal and did I mention excellent flavor?? Enjoy!!
I am working feverishly, not always to be confused with efficiently, on redesigning the theme of the blog. After a good conversation with a friend of mine a few weeks ago, I knew more than ever I wanted to make some changes and mix it up a little.
I love to do so many things in life that to me are second nature, but as she pointed out can be fascinating to so many others. As you all know, I LOVE to cook in my dutch ovens, and as many more don't know, ride horses, hunt, fish, have a garden, and countless other things. So in the coming days, the blog will take on a new look and feel. There will be always be a Tasty Tuesday and I think I will add a day for strictly Dutch Oven cooking as well. Another day, perhaps Wednesdays or Fridays will be a look back into many of the things that I did growing up that I hope you will enjoy and share with your friends and other bloggers.
This weeks post is one that left me scratching me head and I will be the first to admit, when I saw the recipe for Coq au Vin I thought..."What in the world is that?" It was first more of a fact finding journey than knowing what I was about to eat. When I found out it was braised chicken I knew I would love it! Michael Fusco makes this dish outstanding and I will be trying out my own version verrrry soon!!
The recipe is as follows:
Ingredients
- 1/2 lb bacon slices
- 20 pearl onions, peeled, or 1 large yellow onion, sliced
- 3 lbs chicken thighs and legs, excess fat trimmed, skin ON
- 6 garlic cloves, peeled
- Salt & Pepper to taste
- 2 cups chicken stock
- 2 cups red wine (pinot noir, burgundy, or zinfandel)
- 2 bay leaves
- Several fresh thyme sprigs
- Several fresh parsley sprigs
- 1/2 lb button mushrooms, trimmed and roughly chopped
- 2 Tbsp butter
- Chopped fresh parsley for garnish

Brown bacon on medium high heat in a dutch oven big enough to hold the chicken, about 10 minutes. Remove the cooked bacon, set aside keeping the bacon fat in the pan. Working in batches if necessary, add onions and chicken, skin side down. Brown the chicken well, on all sides, about 10 minutes. Halfway through the browning, add the garlic adn sprinkle the chicken with salt & pepper. Adding salt while cooking, instead of at the very end, will bring out the flavor of the chicken.
Spoon off any excess fat. Add the chicken stock, wine, and herbs. Add back the bacon. Lower heat to a simmer. Cover and cook for 20 minutes, or until chicken is tender and cooked through. Remove the chicken and onions to a separate platter. Remove the bay leaves, herb sprigs, garlic and discard.
Add mushrooms to the remaining liquid and turn the heat to high. Boil quickly and reduce the liquid by 3/4 until it becomes thick and saucy. Lower the heat, stir in the butter. Return the chicken and onions to the pan to reheat and coat with sauce. Adjust seasoning. Garnish with parsley and serve.

This dish is a bit of work but WELL worth the effort! Excellent flavor, a great winter time meal and did I mention excellent flavor?? Enjoy!!
This post is part of the following blog carnivals.....Go check out these great sites!!
Monday Mania
Mouthwatering Monday
Hearth 'n Soul
Slightly Indulgent Tuedays
Tuesday Twister
Real Food Wednesday
Gluten-Free Wednesday
Pennywise Platter Thursday
Recipe Swap Thursday
Monday Mania
Mouthwatering Monday
Hearth 'n Soul
Slightly Indulgent Tuedays
Tuesday Twister
Real Food Wednesday
Gluten-Free Wednesday
Pennywise Platter Thursday
Recipe Swap Thursday
Tuesday, October 12, 2010
Tasty Tuesdays! Jersey Style Noodle Pudding
What a wildly busy, wonderfully successful, and sleepless weekend I had just a few days ago! I know this is Tuesday but speaking of yesterday.....Have you ever been THANKFUL that it was a Monday?? I was so excited about Monday being here I could hardly stand it. The previous 7 day week was so jam-packed and busy that I was standing on my tip-toes trying to see the beginning days of the next week so I could schedule a few hours of down-time. Please don't mis-understand!! I love to be busy! As long as I can have some Jason time mixed in there once in a while I'm good. It's the times that we've all had where you turn around and can't remember when you read a book, watched a movie, a ball game, listened to some music or had an adult beverage that life starts to get to you.
This week's post is a dish that until recently, I have never had the pleasure of eating. While some might describe me as an adventurous eater, others might scoff and say that I am a babe in the woods concerning matters of the palate. In many ways, they would both be correct. On one hand, I have eaten what many people wouldn't dream of, except in their nightmares, and on the other, there are limitless other culinary creations that I haven't tried and probably some that I wouldn't on a bet.
This one is not exotic or strange or any of those things and is in fact super easy to make, it just slipped through the cracks I guess and circled back around many years later to land on my plate. Let's get to the recipe!
Ingredients:
3 lbs cooked pasta (egg noodles in this case)
1 quart of 1/2 & 1/2

1 cup macerated raisins (soaked in bourbon or other alcohol...not to worry, it cooks out)
1/2 tbs ground cinammon

1 tbsp brown sugar
Mix together topping ingredients. Sprinkle over pudding. You may leave out raisins if you do not like them.

This week's post is a dish that until recently, I have never had the pleasure of eating. While some might describe me as an adventurous eater, others might scoff and say that I am a babe in the woods concerning matters of the palate. In many ways, they would both be correct. On one hand, I have eaten what many people wouldn't dream of, except in their nightmares, and on the other, there are limitless other culinary creations that I haven't tried and probably some that I wouldn't on a bet.
This one is not exotic or strange or any of those things and is in fact super easy to make, it just slipped through the cracks I guess and circled back around many years later to land on my plate. Let's get to the recipe!
Ingredients:
3 lbs cooked pasta (egg noodles in this case)
1 quart of 1/2 & 1/2
1 cup granulated sugar

1/2 tbs ground cinammon
1 tsp ground ginger

Mix all ingredients together and pour into a buttered pan. Bake in 400 degree oven for 45 minutes. A topping may be made and spread over pudding when baking. Add the topping at the 30 minute mark or approx halfway point.
Topping:
1/2 cup crushed chex or cornflakes
1 tbsp butter, melted
Mix together topping ingredients. Sprinkle over pudding. You may leave out raisins if you do not like them.

This noodle pudding was very delicious and a treat for the taste buds. The sweetness of the sugar, along with the tanginess of the macerated raisins. For me it was an unusual, albeit welcome dessert. Noodles have always been a comfort food in my home and the smooth, al dente texture paired with the crunchy, crumbly topping gave me another reason to try this again very soon!
Enjoy!!
This post is part of the following blog carnivals.......Go check out these great sites!!
Tuesday, September 28, 2010
Tasty Tuesday! Michael's Flourless Chocolate Gateau
Sadly.....I think summer is just about un-officially over here in Oklahoma. The days are struggling to get into the mid 70's and the nights are dropping to the low 50's. I've never bothered to look on the calendar for the beginning of fall, we may have already passed it for all I know.... You can always tell in Oklahoma when you break that cycle of blistering hot days.....it's time to find some long-sleeves because you will need them pretty quickly.
I have a LOT of Dutch oven recipes in the back of my mind for the coming weeks but as I was coming home from the kids soccer game, I had one of those chocolate covered granola bars....the first chocolate in I don't know how long. I brought drinks and snacks for the boys after the game and had some of these left over. It reminded me how much I LOVE chocolate and I just had to post this recipe of Michael's.
Many of you are familiar with him from past blog posts but for those of you that are new, Michael is a family friend and 5 star chef and owner of Michael Fusco's Riverside Grill in Tulsa, OK. Everytime I think he cannot possibly out-do himself, he proves me wrong. When you eat at his restaurant....you WILL tell all your friends about it!! It is better than you could imagine and it's also Gluten free!!
Let's get to the recipe!
Ingredients: Chocolate Mousse
8 oz Bittersweet Chocolate (Callebaut Chocolate from Belgium is used here)
1 cup Heavy Cream
1 Whole Egg
2 Egg Whites
2 Egg Yolks
In a double boiler, melt chocolate.
Combine whole eggs with egg yolks.
 Whip heavy cream to stiff peaks. Whip egg whites to stiff peaks. Whip whole egg mix into chocolate until smooth. Fold whipped whites into chocolate two thirds of the way, then fold whipped cream into chocolate taking care not to over mix. Place into cooler to set.


I have a LOT of Dutch oven recipes in the back of my mind for the coming weeks but as I was coming home from the kids soccer game, I had one of those chocolate covered granola bars....the first chocolate in I don't know how long. I brought drinks and snacks for the boys after the game and had some of these left over. It reminded me how much I LOVE chocolate and I just had to post this recipe of Michael's.
Many of you are familiar with him from past blog posts but for those of you that are new, Michael is a family friend and 5 star chef and owner of Michael Fusco's Riverside Grill in Tulsa, OK. Everytime I think he cannot possibly out-do himself, he proves me wrong. When you eat at his restaurant....you WILL tell all your friends about it!! It is better than you could imagine and it's also Gluten free!!
Let's get to the recipe!
Ingredients: Chocolate Mousse
8 oz Bittersweet Chocolate (Callebaut Chocolate from Belgium is used here)
1 cup Heavy Cream
1 Whole Egg
2 Egg Whites
2 Egg Yolks
In a double boiler, melt chocolate.
Combine whole eggs with egg yolks.


I don't know the proper name of this mold at the time of posting but it is a triangular mold that you can buy at most good restaurant supply vendors.
Ingredients: Chocolate Flourless Cake
1 3/4 LB Bittersweet Chocolate (Callebaut mentioned above)
1 LB Butter
1 LB Sugar
1 cup sugar
8 whole eggs
TT - Coffe Extract (To Taste - you can also use Amaretto or other flavoring)
In a double broiler, melt the chocolate and butter. Combine sugar and coffe extract and bring to a boil. Add the coffe and sugar mixture to the melted chocolate and whip until smooth. Whip in whole eggs one at a time until smooth. Line the bottom of a 10"X15" baking pan with wax paper and pour the chocolate into the pan. Bake at 250 degrees for about two hours or until the middle of the cake is set. When done, let the cake rest at room temperature for 1 hour before putting in the refrigerator. Let chill overnight before unmolding or cutting.
After your cake has chilled, you will cut it into thin strips the width of your mold and place on top of the mousse covering with wax paper ends for the final chill. After chilling, carefully pull the gateau out of the mold and garnish with a bit of whip cream and a fruit topping of your choice.


This is a picture of the flourless cake placed on top of the mousse before the final chill.

Words cannot do justice to this dessert!!
For obvious reasons, (your waistline!) this is not a dessert that you would want to have every week, no matter how much your tastebuds demanded it. It is however, a fantastic choice for a special dinner with that person in your life, birthday, anniversary, etc.... I cannot put into words how delicious this was and since it has been several weeks ago that I had it, I'm ready to have it again!! If you missed it last week, make sure to check out Video Testimonial Friday - Joseph's Story!!
Enjoy!!
This post is part of the following blog carnivals....Go check out these great sites!!
Tuesday, September 7, 2010
Tasty Tuesdays! Spring Arugula w/ Linguine & Toasted Almonds
Whew!! What a weekend! I hope everyone had a great one. I certainly did but seem to have misplaced my get-up and go somewhere along the way. I ate a lot of good food, spent time with great friends and got a lot of things accomplished. I did miss out on a couple of things but am looking forward to catching up on that in a few weeks.
I spent part of the long weekend on the lake and soaked up all the sun possible while I was there. It is quickly becoming that time of year in Oklahoma where the weather rapidly turns cooler and unpredictable for weekend plans. If they forecast 90% chance of rain here it will likely be cloudy and dry whereas if you have a 20% chance, get ready for the monsoon. I've always thought it would be great (and I'm not bashing here) to have a job reporting the weather. It doesn't matter whether you are wrong or right you still get paid!! All you have to say is "Wow!! We did not see this coming!!" and all is forgiven...:-)

 2 cups Arugula (washed & dried)
1/2 cup Almonds (sliced & toasted)
3 oz. Pecorino Romano cheese feather shredded
2 Tbsp green onions chopped
1 cup fresh Linguine
Cracked Pepper (to taste)
1 Tsp. Olive Oil
 Add your olive oil to a hot saute' pan. Add green onions and almonds, cook for two minutes.

Poach linguine until al dente, add to pan.
Toss fresh arugula quickly but do not cook.
Swirl in pan & place in pasta bowl, top with almonds from pan and additional cheese.
 Last but not least, finish with cracked pepper.
Arugula is one of those delicious additions to a meal that many people overlook. It adds a wonderful flavor to pasta or any other dish as well as having super concentrations of vitamins B & C. I'll be the first to admit that I don't take advantage of it in my meals often enough. It was an incredible compliment to this meal. The Pecorino cheese speaks for itself and toasted almonds topped it all off. Pasta is one of my favorite meals, as is obvious to my waistline but I don't foresee giving it up anytime soon! Enjoy!!
I spent part of the long weekend on the lake and soaked up all the sun possible while I was there. It is quickly becoming that time of year in Oklahoma where the weather rapidly turns cooler and unpredictable for weekend plans. If they forecast 90% chance of rain here it will likely be cloudy and dry whereas if you have a 20% chance, get ready for the monsoon. I've always thought it would be great (and I'm not bashing here) to have a job reporting the weather. It doesn't matter whether you are wrong or right you still get paid!! All you have to say is "Wow!! We did not see this coming!!" and all is forgiven...:-)

This week's Tasty Tuesday! post is a favorite of mine and one I thought I should put up right away as it isn't spring any longer, (ie: Spring Arugula) summer is nearly gone and fall is almost here. I love this dish but like many favorites, don't eat it often enough. The recipe is as follows:

1/2 cup Almonds (sliced & toasted)
3 oz. Pecorino Romano cheese feather shredded
2 Tbsp green onions chopped
1 cup fresh Linguine
Cracked Pepper (to taste)
1 Tsp. Olive Oil


Homemade, fresh linguine.....Mmmmm!
I don't have a pasta roller at home but I've always wanted one. You can find them at restaurant supply vendors in your area. After this dish I think I'll see what I can do to add to the kitchen arsenal.
Poach linguine until al dente, add to pan.
Toss pasta in oil mix in pan, season with cheese.
Swirl in pan & place in pasta bowl, top with almonds from pan and additional cheese.

Arugula is one of those delicious additions to a meal that many people overlook. It adds a wonderful flavor to pasta or any other dish as well as having super concentrations of vitamins B & C. I'll be the first to admit that I don't take advantage of it in my meals often enough. It was an incredible compliment to this meal. The Pecorino cheese speaks for itself and toasted almonds topped it all off. Pasta is one of my favorite meals, as is obvious to my waistline but I don't foresee giving it up anytime soon! Enjoy!!
This post is part of the following blog carnivals.....Go check out these great sites!!
Mouthwatering Mondays
Two for Tuesdays
Tempt My Tummy Tuesday
Pennywise Platter Thursday
Mouthwatering Mondays
Two for Tuesdays
Tempt My Tummy Tuesday
Pennywise Platter Thursday
Tuesday, August 31, 2010
Tasty Tuesday! GF Braised Lamb Shoulder
What a wild and crazy weekend we had for the end of August!! Friday night was spent in a favorite pastime for my boys and I, bowling, which we don't do nearly enough of. They are both under 10 so I am still enjoying cool dad status at this point and loving it. My oldest is already taking the phrase "I know dad!" for a test drive so he's starting early.....Sigh!.....Lol.
Friday night was filled with bowling and pizza, Saturday after lunch we had a family get together that took a good part of the afternoon, and Sunday we went to the lake with my oldest friend and his family, cooked, and then went out on his boat. My friend tells me that I am welcome any and every time but I have to bring my Dutch Ovens! He is a recent convert and we often get together and have large cookouts. So I brought the ovens and made a big breakfast casserole with ham and homemade buttermilk biscuits. After breakfast we cleaned up the dishes and the boys rode bikes around the campsite and made friends with all the kids in sight. Their were other boys there very close in age to mine so everyone had a great time.
It's one of those weekends that was jam-packed, fun and super busy, but you have to come back to work just to rest!! I had a lot of ingredients laid out for a Dutch Oven recipe but due to events beyond my control I am chair bound on this beautiful Tuesday with very little freedom to move, or wiggle for that matter. I excercise regularly, lift weights and also walk about 3 times a week, at a brisk pace, usually 2 miles at a time to keep old age and gravity at bay. I took the requisite walk last night and everything went fine until I got back home. I was bent over slightly looking for something when my lower back tightened up on me for no obvious reason. It has continued to tighten and frustrate until I have to move very carefully doing only that which is absolutely necessary. I promise more Dutch Oven recipes in the coming weeks but I didn't feel up to the bending, lifting, and stirring today....
This week's post is another great recipe from Michael Fusco's Riverside Grill in Tulsa, OK. As most of you know, Michael is a family friend, 5 * chef, and has a fantastic restaurant in Tulsa that amazes me everytime I eat there. He holds cooking classes several times a year and gladly shares his fabulous recipes with all who attend. This recipe is a Braised Lamb Shoulder that takes some time to prepare but is worth every minute!

For this recipe you'll need a large Dutch Oven or brazier--one that's big enough to accommodate the meat and stock, and safe for both stovetop and oven. Make sure it has a tight fitting lid as well.

Prep Time: 30 minutes
Cook Time: 4 hours, 30 minutes
Total Time: 5 hours
Ingredients:

5 lbs boned, rolled shoulder of lamb, excess fat removed.
1/4 cup vegetable oil
1 large onion, peeled and chopped
2 medium ribs celery, chopped

1 large carrot, peeled and chopped
1 cup canned tomato puree (or canned crushed tomatoes)
5 cups brown stock or lamb stock
1 bay leaf
1/2 tsp dried thyme
3-4 fresh parsley stems
Lavender (wonderful aromatic)
6 whole black peppercorns
salt, to taste
1/2 cup rice flour
This recipe is excellent with Lamb shoulder but beef works very well also. Shoulder, bottom round, shank, or any other large muscle would work well. You want to trim off excess fat but leave the collagen on the meat. When it is cooked in water over many hours, it breaks down to form gelatin, which is very nutritious.
You must have a large, heavy guage pot or Dutch Oven for this recipe.
Preparation:
Preheat oven to 350 degrees F.

In a heavy, cast iron dutch oven or brazier, heat your oil over high heat, then add the lamb and sear it thoroughly, using a pair of tongs to turn it. When a nice brown crust has developed on all sides of the meat, remove it from the pan and set aside.
Tip: To enhance the browning of the lamb, pat off excess moisture with clean paper towels before searing it.

Add the carrots, celery and onions to the pot and cook for about 5 minutes, until the onion is slightly translucent.
Return the lamb to the pot and add the tomato puree, stock and herbs. Heat on the stovetop until the liquid comes to a boil, then cover with a tight-fitting lid and transfer the whole thing to the oven.
Cook 4-5 hours or until the lamb is tender.
Remove pot from oven, take out the lamb and set it aside, covered, while you make the sauce.
You'll see a layer of fat on top of the braising liquid. We're going to use this fat to make a roux for the sauce. Skim off as much fat as you can, saving about a 1/4 cup of it. You can discard the rest, as it would make the sauce too greasy.
Heat the fat in a separate saucepan, then gradually stir in the flour until a paste forms. Heat for a few minutes, stirring until the roux is a rich brown color.
Return the remaining braising liquid to a boil, reduce to a simmer and whisk in the roux. Reduce for about 15 minutes, then strain through a fine mesh sieve and season to taste with Kosher salt. Slice the lamb across the grain, arrange on warm plates, sauce generously and serve right away.
 This dish was sooo good and I ate every bite! Many people discard them but the leaves of the celery are very useful as aromatics, so leave them in! You might wish to add small baby carrots as the larger ones can be bitter.
Enjoy!
Friday night was filled with bowling and pizza, Saturday after lunch we had a family get together that took a good part of the afternoon, and Sunday we went to the lake with my oldest friend and his family, cooked, and then went out on his boat. My friend tells me that I am welcome any and every time but I have to bring my Dutch Ovens! He is a recent convert and we often get together and have large cookouts. So I brought the ovens and made a big breakfast casserole with ham and homemade buttermilk biscuits. After breakfast we cleaned up the dishes and the boys rode bikes around the campsite and made friends with all the kids in sight. Their were other boys there very close in age to mine so everyone had a great time.
It's one of those weekends that was jam-packed, fun and super busy, but you have to come back to work just to rest!! I had a lot of ingredients laid out for a Dutch Oven recipe but due to events beyond my control I am chair bound on this beautiful Tuesday with very little freedom to move, or wiggle for that matter. I excercise regularly, lift weights and also walk about 3 times a week, at a brisk pace, usually 2 miles at a time to keep old age and gravity at bay. I took the requisite walk last night and everything went fine until I got back home. I was bent over slightly looking for something when my lower back tightened up on me for no obvious reason. It has continued to tighten and frustrate until I have to move very carefully doing only that which is absolutely necessary. I promise more Dutch Oven recipes in the coming weeks but I didn't feel up to the bending, lifting, and stirring today....
This week's post is another great recipe from Michael Fusco's Riverside Grill in Tulsa, OK. As most of you know, Michael is a family friend, 5 * chef, and has a fantastic restaurant in Tulsa that amazes me everytime I eat there. He holds cooking classes several times a year and gladly shares his fabulous recipes with all who attend. This recipe is a Braised Lamb Shoulder that takes some time to prepare but is worth every minute!

For this recipe you'll need a large Dutch Oven or brazier--one that's big enough to accommodate the meat and stock, and safe for both stovetop and oven. Make sure it has a tight fitting lid as well.

Prep Time: 30 minutes
Cook Time: 4 hours, 30 minutes
Total Time: 5 hours
Ingredients:

5 lbs boned, rolled shoulder of lamb, excess fat removed.
1/4 cup vegetable oil
1 large onion, peeled and chopped
2 medium ribs celery, chopped

1 large carrot, peeled and chopped
1 cup canned tomato puree (or canned crushed tomatoes)
5 cups brown stock or lamb stock
1 bay leaf
1/2 tsp dried thyme
3-4 fresh parsley stems
Lavender (wonderful aromatic)
6 whole black peppercorns
salt, to taste
1/2 cup rice flour
This recipe is excellent with Lamb shoulder but beef works very well also. Shoulder, bottom round, shank, or any other large muscle would work well. You want to trim off excess fat but leave the collagen on the meat. When it is cooked in water over many hours, it breaks down to form gelatin, which is very nutritious.
You must have a large, heavy guage pot or Dutch Oven for this recipe.
Preparation:
Preheat oven to 350 degrees F.

In a heavy, cast iron dutch oven or brazier, heat your oil over high heat, then add the lamb and sear it thoroughly, using a pair of tongs to turn it. When a nice brown crust has developed on all sides of the meat, remove it from the pan and set aside.
Tip: To enhance the browning of the lamb, pat off excess moisture with clean paper towels before searing it.
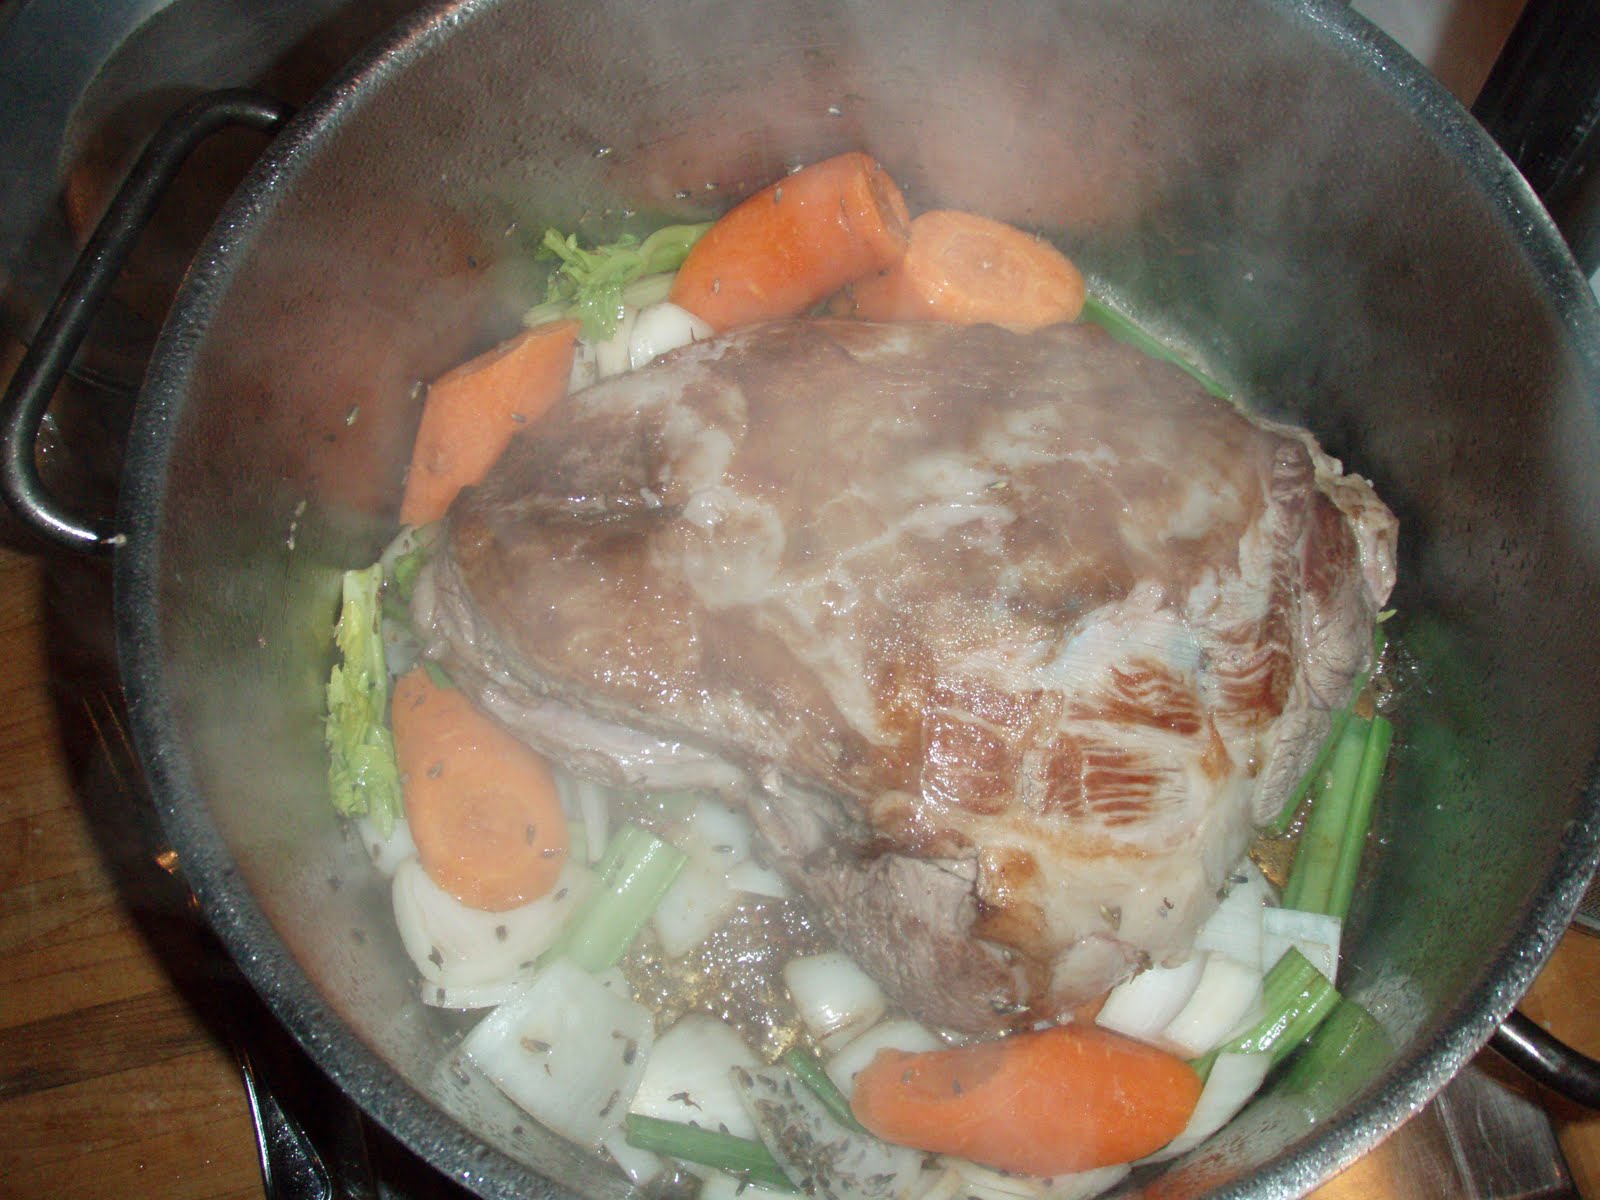
Add the carrots, celery and onions to the pot and cook for about 5 minutes, until the onion is slightly translucent.
Return the lamb to the pot and add the tomato puree, stock and herbs. Heat on the stovetop until the liquid comes to a boil, then cover with a tight-fitting lid and transfer the whole thing to the oven.
Cook 4-5 hours or until the lamb is tender.
Remove pot from oven, take out the lamb and set it aside, covered, while you make the sauce.
You'll see a layer of fat on top of the braising liquid. We're going to use this fat to make a roux for the sauce. Skim off as much fat as you can, saving about a 1/4 cup of it. You can discard the rest, as it would make the sauce too greasy.
Heat the fat in a separate saucepan, then gradually stir in the flour until a paste forms. Heat for a few minutes, stirring until the roux is a rich brown color.
Return the remaining braising liquid to a boil, reduce to a simmer and whisk in the roux. Reduce for about 15 minutes, then strain through a fine mesh sieve and season to taste with Kosher salt. Slice the lamb across the grain, arrange on warm plates, sauce generously and serve right away.

Enjoy!
This post is part of the following blog carnivals.....Go check out these great sites!!
Monday Mania
Mouthwatering Mondays
Two for Tuesdays
Slightly Indulgent Tuesday
Tuesday Twister
Gluten-Free Wednesday
Pennywise Platter Thursday
Recipe Swap Thursday
Monday Mania
Mouthwatering Mondays
Two for Tuesdays
Slightly Indulgent Tuesday
Tuesday Twister
Gluten-Free Wednesday
Pennywise Platter Thursday
Recipe Swap Thursday
Tuesday, August 24, 2010
Tasty Tuesday! GF Penne Genovese
Wow I am sooo sleepy today! I got up early this morning and went for a short walk as it was about to rain again! Twice in one week, woohoo! I spent the weekend with friends and was very busy but had a great time. We got several things accomplished, went to the races, and even got a little lake time thrown in for good measure. I got quite a bit of sun and I am somewhere around that fine line between just enough and too much sun. It was never painful but we'll just have to wait and see if I start peeling. (Don't you just love when your face peels from a sunburn! Lol) People look at you and say "Got yourself a sunburn, didn't you?" Like you didn't know already....
My neck and back feel like a million bucks today thanks to Dr. Martinez, my esteemed chiropractor. Anytime you need services in Tulsa, OK you should give him a call. He is verrrrry good. Yes, I get charged regular price, and no I don't get discounts for plugs on the blog. Lol. I do however, believe in telling others when you get a good product or service, so I do that here to let the readers know....
With all that sun and the rain today I am super sleepy but determined to carry on in honor of you, the readers. I have more Dutch Oven recipes ready to post but this week wanted to put up another 5* recipe for those fans. If you are new to the site, you can find navigation buttons for popular topics under the header. If you scroll down to Labels on the right side you can find all of the subjects I blog about including Dutch Oven recipes, Diet & Nutrition, and many other topics.
This post is a fantastic Penne Genovese recipe from Michael Fusco's Riverside Grill in Tulsa, OK. If you haven't eaten there you should try it once. I guarantee you will go back again and again. This recipe is a favorite of mine and it is sooo delicious! I haven't had it in way too long but am glad to share it here. Why is it that many of our all time favorite dishes only get made a handful of times a year?? I know it happens to me more than it should and was just curious if anyone has the answer....Alright let's get to the recipe! Serves 4
 Ingredients
4 sprigs fresh basil (for garnish)
4 Tbsp basil pesto or more
3 oz. olive oil
2 Tbsp grated Pecorino Romano cheese
2 Tbsp toasted pine nuts
Salt & Pepper to taste
1 lb imported penne pasta (Your favorite GF pasta or DeBoles makes a good one)
1 gallon water
2 Tbsp salt
In a saute pan, heat a touch of white wine and olive oil to medium heat.

 Add pesto and pine nuts. Saute until aromatic.
Bring salted water to boil and add penne. Stir occasionally & cook until al dente. Drain excess liquid.


Toss pasta in hot pesto. Remove and place in bowl. Top with Pecorino & garnish with basil tops.
Pesto is one of those things that many people love, myself included, but know very little about. It can be found in many places but the best known locale is Genoa, Italy. In ancient times, the extra basil crop was made into paste and mixed with lemon juice and covered with oil for preservation. Traditional pesto consists of basil, garlic, olive oil, pine nuts, cheese and lemon juice.
This dish, as you see here, was served with a couple slices of pork tenderloin for added flavor or maybe because I looked really hungry that night! It can be served with an added meat like the pork loin or it is also an excellent stand alone dish. It has been a couple of weeks since I have had this and just looking at the pictures and writing this post makes me hungry. I better go see what I can do to remedy that.......Enjoy!!
My neck and back feel like a million bucks today thanks to Dr. Martinez, my esteemed chiropractor. Anytime you need services in Tulsa, OK you should give him a call. He is verrrrry good. Yes, I get charged regular price, and no I don't get discounts for plugs on the blog. Lol. I do however, believe in telling others when you get a good product or service, so I do that here to let the readers know....
With all that sun and the rain today I am super sleepy but determined to carry on in honor of you, the readers. I have more Dutch Oven recipes ready to post but this week wanted to put up another 5* recipe for those fans. If you are new to the site, you can find navigation buttons for popular topics under the header. If you scroll down to Labels on the right side you can find all of the subjects I blog about including Dutch Oven recipes, Diet & Nutrition, and many other topics.
This post is a fantastic Penne Genovese recipe from Michael Fusco's Riverside Grill in Tulsa, OK. If you haven't eaten there you should try it once. I guarantee you will go back again and again. This recipe is a favorite of mine and it is sooo delicious! I haven't had it in way too long but am glad to share it here. Why is it that many of our all time favorite dishes only get made a handful of times a year?? I know it happens to me more than it should and was just curious if anyone has the answer....Alright let's get to the recipe! Serves 4

4 sprigs fresh basil (for garnish)
4 Tbsp basil pesto or more
3 oz. olive oil
2 Tbsp grated Pecorino Romano cheese
2 Tbsp toasted pine nuts
Salt & Pepper to taste
1 lb imported penne pasta (Your favorite GF pasta or DeBoles makes a good one)
1 gallon water
2 Tbsp salt
In a saute pan, heat a touch of white wine and olive oil to medium heat.


Bring salted water to boil and add penne. Stir occasionally & cook until al dente. Drain excess liquid.


Pesto is one of those things that many people love, myself included, but know very little about. It can be found in many places but the best known locale is Genoa, Italy. In ancient times, the extra basil crop was made into paste and mixed with lemon juice and covered with oil for preservation. Traditional pesto consists of basil, garlic, olive oil, pine nuts, cheese and lemon juice.
This dish, as you see here, was served with a couple slices of pork tenderloin for added flavor or maybe because I looked really hungry that night! It can be served with an added meat like the pork loin or it is also an excellent stand alone dish. It has been a couple of weeks since I have had this and just looking at the pictures and writing this post makes me hungry. I better go see what I can do to remedy that.......Enjoy!!
This post is part of the following blog carnivals.....Go check out these great sites!!
Tuesday, August 3, 2010
Tasty Tuesdays! Green Bean Salad with Feta
Its that time of the week again, time for the Tasty Tuesday! recipe post that we all look forward to. Here in sparkling Tulsa, OK this week it has been HOT with plenty of humidity!! The past several days it has been 100+ degrees. Sunday & Monday were 104 - 105 with more sunshine in the forecast. On the bright side, it's only supposed to reach 95 on Thursday....Where did I put my coat??...... Besides making me want to work on my tan, swimming, stay in the air conditioner, etc. this weather makes me think of lighter foods. Heavy meals and hot weather for me are like oil & water, they just don't mix.
This week's post is a lighter dish, well suited to hot weather and again many thanks to Michael of Michael Fusco's Riverside Grill in Tulsa, OK. Great food, great atmosphere, and his cooking classes are awesome too.
The recipe is as follows: Makes 6 - 8 servings

1 small red onion, chopped (about 1/2 cup)
 1/2 cup pitted & split Kalamata olives
 4 Roma tomatoes split & oven roasted
1/2 cup olive oil
 1/2 cup lemon juice
 2 ounces crumbled Feta cheese
 1/2 cup toasted sliced almonds
It took me a long time to learn this and sometimes I still don't practice what I preach but it helps a great deal to have all of your ingredients measured, assembled, and ready to go when you start cooking. It seems like a small step but one that we often forget.
You will want to slice your tomatoes lengthwise and roast in the oven around 350-375 for 20-40 minutes depending on size. Your goal is to evaporate the water as much as possible from them. Put a bit of olive oil and sea salt after roasting....mmmmmmm......You can add basil or tri-herb to concentrate the flavor as well.
 Cook your green beans in boiling salted water for approx. 8 minutes or until crisp-tender. Drain and plunge into ice water to stop the cooking process. Drain and pat dry. Place in a serving bowl, cover and chill for at least 2 hours. When boiling the water for your green beans, there are a couple of tricks you can use to preserve the color such as sprinkling a touch of baking soda in the water or using empty egg shells. This not only works for green beans but any other green vegetable as well. This will allow you to keep the bright colors and the food won't appear washed out. (I learn something in every class!)
Add chopped onion (I love Vidalia's), Kalamatas, Romas, and Lemon Vinaigrette to beans, tossing to coat. Sprinkle with feta and almonds.
 Something else I learned was about olive oil. The general, run of the mill olive oil that you buy in the store is machine pressed to extract the oil. Good quality, flavor, etc. from this type of oil and we all know how healthy it is for us. Virgin olive oil is from unpressed olives that are stacked in pans and the weight of the olives presses the oil out the bottom and it is collected. Extra virgin is done in the same way but the pans are stacked much shorter, and if you notice when you look at the oil, the colors are much different on each one. The extra virgin often has a much deeper color than the other varieties. I don't know about the health benefits of each one but the oil seems to sell itself, at least in our home, we cook with it all the time.....
This salad was one that I hadn't had in a looong time and it was very good. Crisp green beans, tomatoes, sliced almonds and the tangy cheese all made a great combination. Not to mention it is naturally Gluten Free!
Stay tuned next week for another Dutch Oven post. I got a new 12" oven and I've already been looking for recipes. Also you will likely see the page change in the coming days. I will be adding buttons on the top for popular search items such as 5* recipes, Dutch Oven recipes etc....I have so many questions about Dr. Wise and his formula, Intestinal Calm for Celiac disease, that I wanted to put some navigation buttons for ease of use. Hopefully that will make the blogging and learning process a bit faster for your busy lives.
This week's post is a lighter dish, well suited to hot weather and again many thanks to Michael of Michael Fusco's Riverside Grill in Tulsa, OK. Great food, great atmosphere, and his cooking classes are awesome too.
The recipe is as follows: Makes 6 - 8 servings
1 1/2 pounds green beans, trimmed


1/2 cup olive oil


It took me a long time to learn this and sometimes I still don't practice what I preach but it helps a great deal to have all of your ingredients measured, assembled, and ready to go when you start cooking. It seems like a small step but one that we often forget.
You will want to slice your tomatoes lengthwise and roast in the oven around 350-375 for 20-40 minutes depending on size. Your goal is to evaporate the water as much as possible from them. Put a bit of olive oil and sea salt after roasting....mmmmmmm......You can add basil or tri-herb to concentrate the flavor as well.

Add chopped onion (I love Vidalia's), Kalamatas, Romas, and Lemon Vinaigrette to beans, tossing to coat. Sprinkle with feta and almonds.

This salad was one that I hadn't had in a looong time and it was very good. Crisp green beans, tomatoes, sliced almonds and the tangy cheese all made a great combination. Not to mention it is naturally Gluten Free!
Stay tuned next week for another Dutch Oven post. I got a new 12" oven and I've already been looking for recipes. Also you will likely see the page change in the coming days. I will be adding buttons on the top for popular search items such as 5* recipes, Dutch Oven recipes etc....I have so many questions about Dr. Wise and his formula, Intestinal Calm for Celiac disease, that I wanted to put some navigation buttons for ease of use. Hopefully that will make the blogging and learning process a bit faster for your busy lives.
Enjoy!!
This post is part of the following blog carnivals.......Go check out these great sites!!
Mouthwatering Mondays
Monday Mania
Two for Tuesday
Tempt My Tummy Tuesday
Slightly Indulgent Tuesday
Whats On The Menu Wednesday
Gluten-Free Wednesdays
Real Food Wednesday
Pennywise Platter Thursday
Prairie Story: BBQ Recipe Swap
Fight Back Friday
Mouthwatering Mondays
Monday Mania
Two for Tuesday
Tempt My Tummy Tuesday
Slightly Indulgent Tuesday
Whats On The Menu Wednesday
Gluten-Free Wednesdays
Real Food Wednesday
Pennywise Platter Thursday
Prairie Story: BBQ Recipe Swap
Fight Back Friday
Friday, July 30, 2010
Flavors Baked Fudge Friday
Friday is already here with a packed weekend schedule straight ahead. Mine is to be a working weekend but never fear I will be learning something new and fun in the process so that makes it a lot less work. To kick off the start of the weekend I wanted to dust off an old recipe from Michael Fusco, a friend of mine who is also a 5 * chef here in Tulsa, OK. You can visit his webpage, Michael Fusco's Riverside Grill and make a reservation for dinner at your earliest opportunity. You WILL be very happy that you did!
This recipe is one of those super-secret, just pulled out of the vault, oh so delicious desserts that takes a little time but it well worth the effort. Thanks to Michael for allowing me to post it for the readers. The recipe is as follows:
Ingredients-
9 ounces dark chocolate
7 ounces butter (Whole, unsalted)
11 ounces sugar
8 egg yolks
8 egg whites
Directions:
 Melt chocolate with butter over double boiler (not direct heat!). Work 1/2 the sugar with the yolks and reserve the other 1/2 for the whites.
 Add the chocolate mixture to the yolks.

 Beat whites to stiff peaks (Medium mix speed until foamy, high speed for 2-3 minutes.) and add the remaining sugar. Beat until smooth. Fold the whites into the chocolate mixture and allow to set in refrigerator.
Fill individual 8" baking pan half full with mousse. Bake in 350 degree oven 25-30 minutes. Let cool. Refill pan with additional mousse and freeze. Cook again in 400 degree oven for 25-30 minutes. Inside of fudge should be moist and almost fluid. Serve very warm.


This recipe is one of those super-secret, just pulled out of the vault, oh so delicious desserts that takes a little time but it well worth the effort. Thanks to Michael for allowing me to post it for the readers. The recipe is as follows:
Ingredients-
9 ounces dark chocolate
7 ounces butter (Whole, unsalted)
11 ounces sugar
8 egg yolks
8 egg whites
Directions:


Fill individual 8" baking pan half full with mousse. Bake in 350 degree oven 25-30 minutes. Let cool. Refill pan with additional mousse and freeze. Cook again in 400 degree oven for 25-30 minutes. Inside of fudge should be moist and almost fluid. Serve very warm.


This dessert turned out sooo good!! The inside was not fluid as described in the recipe (baked slightly too long because we were busy talking in the class!) but it was excellent and still had a soft, very warm center. Enjoy!!
Tuesday, July 27, 2010
Tasty Tuesdays! GF Sausage, Egg & Pepper Sandwich
It has been sooooo busy these past several weeks. I know the last time I looked at the calendar it was Memorial Day and now it's the end of July. Where does it all go? Between camping, fishing, pulling teeth, and all of the other things that happen between breakfast and bedtime time just flies. I always wanted to fly....pardon me.....back to the blogging. :) My boys just got back from spending several days with their granddad. He spends quite a bit of time with them but wanted to get them individually this summer. I took my oldest down and then we traded kids at the halfway through so he got to spend a bit more than 3 days each with them. We were originally shooting for a week each but life got in the way. He had a Colorado trip that had been planned for a year and the boys had other activities going as well. They had a GREAT time together and talk about it constantly. My dad is a lot more mellow than I used to remember but I suppose that is the way it's supposed to be with your grandkids.
I plan to do some more Dutch Oven cooking soon, as I got a new 12" oven from dad that I'm dying to try. You can see some of my Dutch Oven recipes on the right hand side when you look at the archives.This week's recipe is one that I have had in different variations in my life but never quite like this. I have been to a good number of the 5* cooking classes at Michael Fusco's Riverside Grill in Tulsa, OK this summer. Michael is a family friend and an unbelievable chef!! I really enjoy the classes and you the readers get to "go" along with me as you read the Tasty Tuesdays! posts. It's often enjoyable to write about something like this class after you've taken it because you remember and pick up on things that you didn't when you were there before. This one is super easy and sooo good! Ok, on to the recipe! It is as follows:
 Ingredients:
2 Tbps. olive oil
1 medium onion, thinly sliced
 1 green bell pepper, sliced
3 eggs, beaten
Sea salt & freshly ground black pepper

 1 Large link of sweet Italian sausage (browned and cooked) 400 degree oven is the best way....
Feather shredded Pecorino Romano as desired
1 Loaf GF Italian bread (such as a bastone or a chiabatta)
Preparation:
When browning the sausage, it is best to put it in a 400 degree oven. This browns it very nicely and you can do it a step ahead to save time or prepare more sausages to have extras for future meals.
Heat a saute' pan over medium heat then add enough olive oil to cover the bottom. Add the onion and peppers, regulating heat so the onions don't burn. Saute' until the peppers have softened.
Slice the sausage on an angle and add to the peppers / onions & brown. You want to brown well for a rustic flavor and aroma. Just until the sausage skin is ready to come off but still attached.

 Raise the heat to medium-high nad add the beaten eggs. Stir to combine with the onions and peppers and season with salt and pepper. Cook, stirring occasionally, until the eggs are set.
Slice the bread lengthwise without cutting all the way through, remove center. When the eggs are done, gently slide them onto the bread to make a sandwich and cut the loaf into four portions. Serves 2 - 4.

 By the way, this tasted better than it looked, and that is really saying something! I am normally not a bell pepper fan but the sandwich was delicious! I have eaten many new things taking these classes than I normally would. Enjoy!!
I plan to do some more Dutch Oven cooking soon, as I got a new 12" oven from dad that I'm dying to try. You can see some of my Dutch Oven recipes on the right hand side when you look at the archives.This week's recipe is one that I have had in different variations in my life but never quite like this. I have been to a good number of the 5* cooking classes at Michael Fusco's Riverside Grill in Tulsa, OK this summer. Michael is a family friend and an unbelievable chef!! I really enjoy the classes and you the readers get to "go" along with me as you read the Tasty Tuesdays! posts. It's often enjoyable to write about something like this class after you've taken it because you remember and pick up on things that you didn't when you were there before. This one is super easy and sooo good! Ok, on to the recipe! It is as follows:

2 Tbps. olive oil
1 medium onion, thinly sliced

3 eggs, beaten
Sea salt & freshly ground black pepper


Feather shredded Pecorino Romano as desired
1 Loaf GF Italian bread (such as a bastone or a chiabatta)
Preparation:
When browning the sausage, it is best to put it in a 400 degree oven. This browns it very nicely and you can do it a step ahead to save time or prepare more sausages to have extras for future meals.
Heat a saute' pan over medium heat then add enough olive oil to cover the bottom. Add the onion and peppers, regulating heat so the onions don't burn. Saute' until the peppers have softened.
Slice the sausage on an angle and add to the peppers / onions & brown. You want to brown well for a rustic flavor and aroma. Just until the sausage skin is ready to come off but still attached.


Slice the bread lengthwise without cutting all the way through, remove center. When the eggs are done, gently slide them onto the bread to make a sandwich and cut the loaf into four portions. Serves 2 - 4.


This post is part of the following blog carnivals.......Go check out these great sites!!
Subscribe to:
Posts (Atom)